Aquarium Co-Op
Aquarium Co-Op Easy Flow Sponge Filter Upgrade Kit
Aquarium Co-Op Easy Flow Sponge Filter Upgrade Kit is backordered and will ship as soon as it is back in stock.
Delivery and Shipping
Delivery and Shipping
Product Refunds & Returns
- Returns can be processed within 14 days from purchase.
- To return products, they must be in original condition
- Shipping expenses are not refundable
- If your items have been damaged in shipping, please contact us within 24 hours of receipt with photos, and we will assist you.
Livestock Refunds, Returns, & Surrenders
- If you are unhappy with your livestock for any reason, you can bring it back within 72 hours for a full refund; we do not pick up returns

Aquarium Co-Op Easy Flow Sponge Filter Upgrade Kit
Aquarium Co-Op Easy Flow Sponge Filter Upgrade Kit
Description
Description
Aquarium Co-Op Easy Flow Sponge Filter Upgrade Kit available @yourlocalfishstore Vancouver Canada
Free Shipping over $79.99 across Canada on all Dry Goods / Live Plants
- Increases flow in the aquarium.
- Comes with an air collar to make smaller bubbles.
- Attaches to Aquarium Co-Op sponge filters.
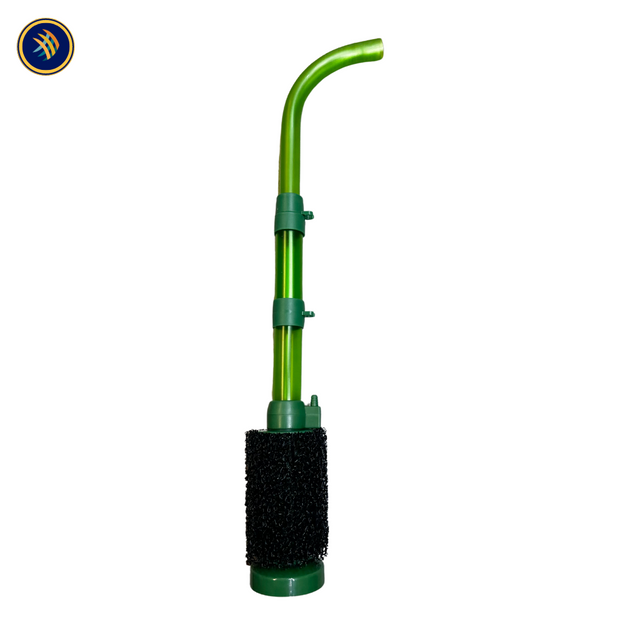
If you need greater water circulation from your Aquarium Co-Op sponge filter, try this Easy Flow accessory. By lengthening and curving the uplift tube, water flows out of the sponge filter horizontally across the water surface, increasing the current in the fish tank.
The Easy Flow sponge filter upgrade kit also comes with an air collar that attaches to the base of the uplift tube. The airline tubing connects to this air collar, which creates smaller bubbles much like an air stone. These little bubbles help to create more continuous flow and optimize the sponge filter's performance.
If you already own an Aquarium Co-Op sponge filter, use the Easy Flow attachments to improve circulation in your tanks. It works with our small, medium, and large sponge filters, as well Aquarium Co-Op nano sponge filters that were made after 2023.
Directions/Specifications
| Item | Minimum Height | Maximum Height |
| Easy Flow only (with no sponge filter) | 7.5 inches | 17.5 inches |
| Small sponge filter with Easy Flow | 10.5 inches | 20.5 inches |
| Medium sponge filter with Easy Flow | 12.5 inches | 22.5 inches |
| Large sponge filter with Easy Flow | 12.5 inches | 22.5 inches |
Directions for Upgrading Your Sponge Filter
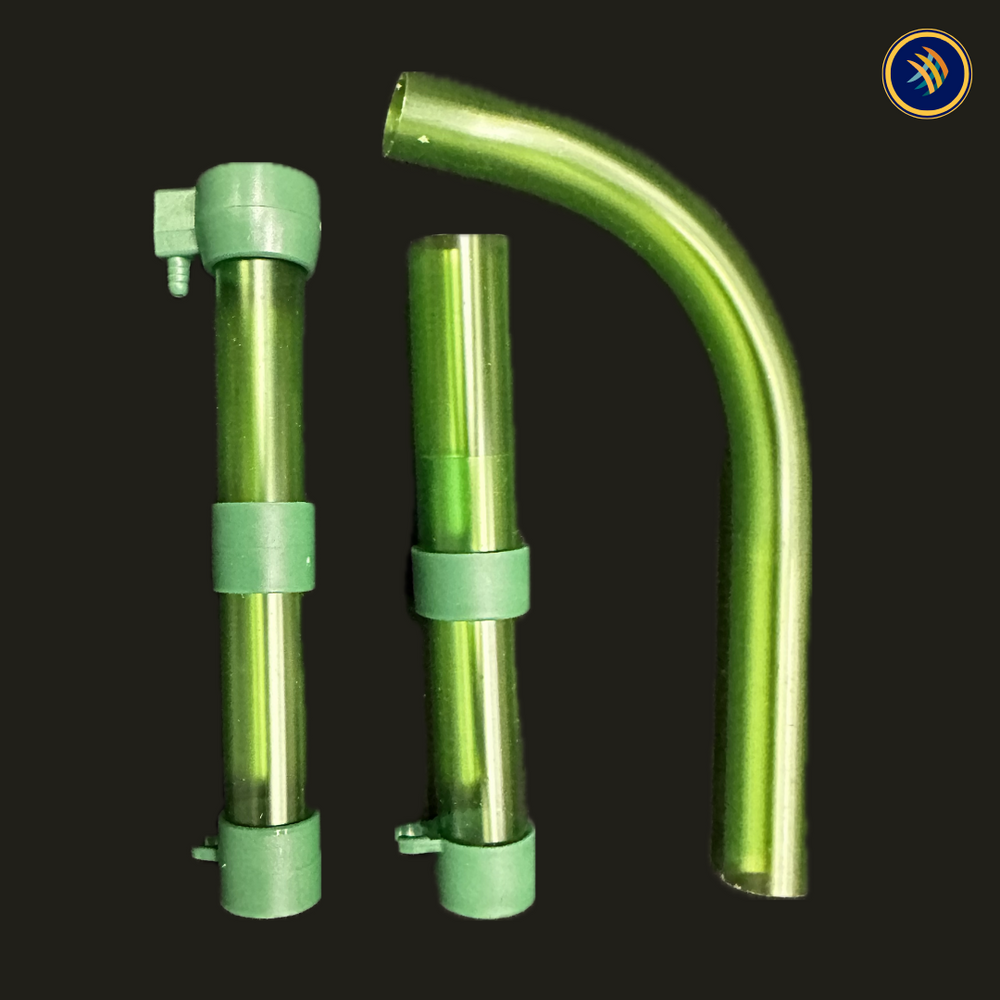
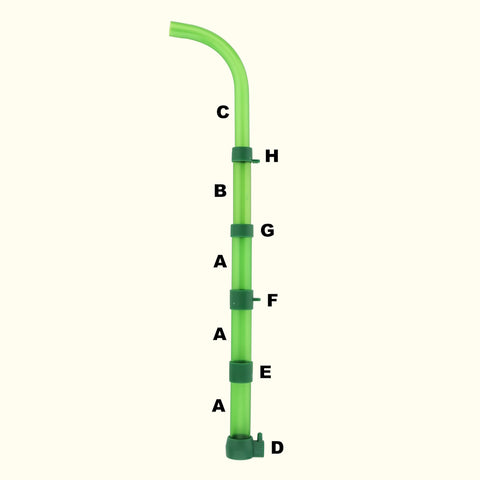
1. Lay out the pieces of Easy Flow. You should have five translucent green tubes:
— 3 short and wide tubes (part A)
— 1 tall and skinny tube (part B)
— 1 curved tube (part C)
You should also have five solid green connectors:
— 1 air collar with a small nipple for connecting airline tubing (part D)
— 1 wide connector with no airline tubing holder (part E)
— 1 wide connector with an airline tubing holder (part F)
— 1 small connector with no airline tubing holder (part G)
— 1 small connector with an airline tubing holder (part H)
Note: Each connector has a rounded opening and a flat-edged opening. The rounded opening should be facing upward, while the flat opening is facing downward toward the sponge filter.

2. Remove the uplift tube from the sponge filter. Also, remove any air stone and airline tubing that are installed inside the sponge filter.
3. Attach the air collar (part D) to the green plastic bullseye on the top of the sponge filter. Then attach one of the short and wide Easy Flow tubes (part A) to the air collar.
4. Attach the wide connector with no airline tubing holder (part E) and then one of the short and wide tubes (part A).
5. Attach the wide connector with an airline tubing holder (part F) and then one of the short and wide tubes (part A).
6. Attach the small connector with no airline tubing holder (part G) and then the tall and skinny tube (part B). Note: the part B tube will slide inside of the part A tube if you want to shorten the height.
7. Attach the small connector with an airline tubing holder (part H) and then the curved tube (part C). The shorter end of the curved piece has an angled kink in the tube, while the longer end is straight. Insert the shorter, kinked end of the curved piece into the connector. Make sure the kink in the tube sits above the top of the small connector (part H). If you push the curved piece too far down, air bubbles will escape from the connector.
8. Line the airline tubing holders so they all face the same side of the tubes, right above the nipple of the air collar (part D). Then rotate the straight end of the curved piece so that it faces away from the airline tubing holders.
9. Connect one end of the airline to the side of the air collar (part D),and connect the other end of the airline tubing to a Single Battery Pump (If the air pump is located in a position lower than the top of the fish tank, use a Check Valve in the middle of the airline tubing to prevent flooding.)
10. Snap the airline tubing to the airline tubing holders on the side of the Easy Flow connectors to keep it in place.

11. Place the sponge filter in the aquarium. To minimize bubbles and maximize flow, the curved outlet piece of the Easy Flow accessory should be slightly above the water line.
How to Adjust the Height of Easy Flow
1. To shorten the Easy Flow accessory, remove the short and wide tube (part A) that is closest to the sponge filter and the wide connector with no airline tubing holder (part E) just above it. Then reconnect the rest of the Easy Flow parts to the air collar (part D).
2. To shorten it even more, repeat Step 1. Remove the short and wide tube (part A) that is closest to the sponge filter and the wide connector with an airline tubing holder (part F) just above it. Then reconnect the rest of the Easy Flow parts to the air collar (part D).
3. To reach the minimum possible height, push the tall and skinny tube (part B) downward so that it slides inside the tube closest to the sponge filter (part A). The two small connectors (parts G and F) should be touching each other.

Specifications
Specifications
-
CategoryFilters, Kit
-
Product TypeSponge Filter
Payment & Security
Payment methods
Your payment information is processed securely. We do not store credit card details nor have access to your credit card information.